Printmaking Definitions: Viscosity Printing
Intaglio / Etching | Drypoint | Lithography | Relief Printing | Screen Collograph | Cyannotypes | Viscosity Printing
The Viscosity Printing Process:
1) the design of the work has to be planned to some degree beforehand to ensure that the intaglio plate is sufficiently etched to ensure there are multiple levels in the plate to encourage the separation of colours during the printing process. If the image is basically flat the colours won't separate properly. |
Example:
|
In this example you will see basically 2 -3 colours. The pink area was not well considered as it doesn't work with this process...sometimes the etch bites down too deep and takes too much away leaving areas that don't hold the ink. This was my first trial viscosity print. |
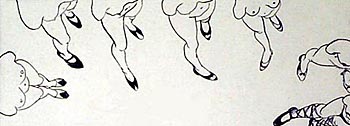
Examples of colour trials:
|
This is my second try at viscosity printing during my BFA thesis year. This process is an interesting way to create a colour print without using multiple plates. In this image you can see the marks of the ink roller on the knee on the second image. So essentially there are too many wide open spaces of the same depth, making the image a little flat in colour and texture. |
|
2) So areas of the plate need to be strategically etched to have enough depth and texture to hold ink to create interesting areas of colour. Zinc plates are likely better for this type of mega etching. Making sure you have rollers that cover the whole of your plate is also important to not have unwanted marks. |
||
3) Once the areas have been etched to your satisfaction, then the colour viscosity printing can begin. So using the blue, red and yellow example; the first colour is inked as a regular etching (see intaglio printing). In the example below the first colour would have been a dark reddish ink. |
Example
|
The viscosity of the ink refers to how thick or thin the ink is or how it has had oils etc. mixed in to affect the fluidity of the ink. |
4) The second and third colours are added using large rollers of different softness or density. The first roller used is a hard roller using a high viscosity ink that deposits ink on the surface of the plate but it is not soft enough to hit the lower areas. So the harder roller deposits the ink mainly on the higher areas. |
Examples
|
In these examples you can clearly see the colour separation created using this colour viscosity process.
|
5) Then the third colour is deposited using a very softer roller and a middle range viscous ink. The two inks generally repell one another creating some mixing and some colour separation. Inking and Printing the Intaglio Plate You tube videos: Viscosity Printing - Marta Di Donna - shows the use of large rollers & laying out the ink etc. |
||


Created by Gisele Beaupre ©